How to use Sensitivity sublabels to protect information between groups inside a tenant.
What you need to use AIP/Sensitivity labels in your organization: Requirements
Microsoft has changed focus from the traditional AIP labels to what they have called sensitivity labels. For an explanation of the AIP labels vs Sensitivity labels look at the following blog post: azure information protection client and portal
The protection in AIP labels and Sensitivity labels is the same. It all comes from the same settings. For a deeper explanation on the protection settings in AIP labels/Sensitivity labels, you can read here: How Microsoft Information Protection protects data
So, how will will we create these boundaries in this blog post? Microsoft suggests 4 or 5 labels and feels this should be enough in most cases. In principle I agree, but what in our case were we have more than one organization/project group etc. in the same tenant? How do we separate them? How do we make sure we can protect information so that we create boundaries between the organizations? The answer is groups and sublabels. And to make this work, we use mail enabled groups in Azure.
 |
| We may work as teams, and still want to separate some of the things we work on. |
And what is a sublabel you ask? Well, when we have created a label (a top label if you will), we get the opportunity to create sublabels for it. This effectively turns the top label into a drop down menu, and it can no longer be selected. You can only select the items on your drop down menu (sublabels).
So, back to our example: We have 4 project groups: Andeby, Duckville, Gotham and Smallville. As mentioned over they want to be able to share information between the project groups, but they also have some things that they want for themselves. We have one default group containing all members of the tenant. In addition we create four more. (remember, they need to be mail enabled to work). The top line of labels is what everyone sees, while the sublabels is based on which group you are in.
 |
| Some labels that everyone sees (Personal, General, Internal, and My Group (Or just My as I have called it) |
We create our four groups (in my case I created Office 365 groups, but you can also create mail enabled groups on-premises and syncronize them to Azure AD):
Andeby
Duckville
Gotham
Smallville
We open our Office 365 Portal and go to Admin as usual:
 |
| Our trusty friend the Office 365 portal. |
This takes
us to the M365 admin portal. You may
have to expand to see all options:
 |
| You may wonder why it can't just show all as default, and I do not know the answer. |
And expand
again to see all admin centers
 |
| There are quite a few admin centers now. |
Now, since
Microsoft are upgrading their tenants, you may see one of the two options
depending on if you have the new portal or old:
Security
& Compliance
Or
Compliance
Here we go
to Compliance:
 |
| Compliance contains all classification and label settings. |
In our
Compliance portal, we can expand Classification and select Sensitivity labels:
 |
| Our sensitivity labels |
This will
show either a default setup or a migrated (from AIP portal) setup.
 |
| These are the default labels in my demo tenant. You may see something different. |
In our example we will use this as a start. We will have:
Personal –
No protection. Will be used for emails that is not work related.
General –
Internal for the entire tenant, but no need for protection.
Internal –
Internal for the entire tenant. Protected so that only members of the tenant
can read the content.
Highly
Confidential – Internal for the entire tenant. Protected so that only member of
the tenant can read it. Not print, save as, print screen forward etc.
And then we
will create a new "top" label called My (I am truly sorry for my lack of imagination today). This will be seen by all. But it can
not be selected. Instead a sublabel will be visible for you based on which group
you work in.
Selecting
Create a label will bring out the New sensitivity label wizard: We fill in the details for our label and select Next
 |
| Tooltip is what users will see if they hover the mouse over the label, so it is smart to have something discriptive. |
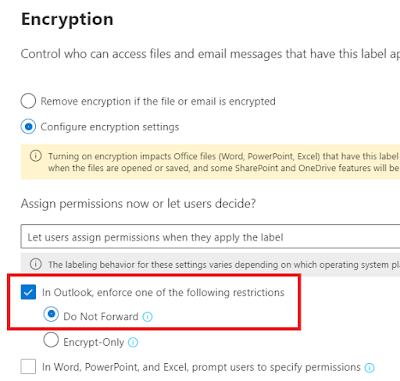
Here we need to decide if we want to have Encryption or not. We do, so we also need to assign permissions.
 |
| We left everything as default here. |
Since this is our top label, we can add a group containing all the users that will have a sublabel here. In my case I will add all tenant members:
 |
| You can add email addresses or domains as well. Can be useful if your team crosses domain borders. |
We leave
the Co-Author rights and Save:
 |
| Decide which rights you want users to have. |
See that the settings look correct and press Next.
Since this is the top label, we will leave content marking off:
 |
| The top label does not need visual markings. |
We do not touch the Endpoint data loss prevention settings. Next
 |
| No WIP here, so we leave this off. |
Auto labeling
Off.
 |
| The top label will not be auto applied. |
 |
| You can Edit settings here as well. |
Our top label is created! Now we have the label that will end up being little more than a pull down menu. And it is time to add some sublabels. The labels doing the actual work in our case. See those little dots on the right? (in the image below) Click those and select Add sub-label:
 |
| We can also arrange the labels here, but in our case that will not matter. |
We give it
a name and fill in details. Once again I urge you to put a little time into the Tooltip. Explaining that this will make sure it is protected and who it is protected for/from is not a bad idea.
 |
| Andeby sublabel is on it's way |
Since this label will be used to protect data from the other factions, we want to encrypt the files:
 |
| To encrypt or not to encrypt that is the ... |
 |
| Take a look at what de different permissions give us. |
We assign
permissions. Since this label will be for the employees of Andeby, we assign permissions to the group containing the employees in that project group. Remember: Only the members of this group can read content protected by this label:
 |
| We can search to find our groups more easily. (Remember it needs to be mail enabled) |
When this is done we can see that one user or group has been added and we know that this is the Andeby group:

Done and then
Save before we can see our Encryption options and then choose Next:
 |
| Our group is Co-Author |
Next we may
want to add some content marking, for instance a header. This means that when content is protected by this label it will receive a header/footer or watermark, depending on what we choose. I have chosen a header in the example below, but if you want the content to be more secure you may want to use a watermark. A header can be cut away without ruining the document while a watermark protects against this:

 |
| Content marking can be useful at times. |
Then we
just go through the rest and choose Create on the review your settings page.
We repeat the process for the other sublabels. When we
have gone through the setup for all of them it looks something like this:
 |
| Here we have gone through the different label configurations. |
 |
| No use just creating. We also need to publish. |
 |
| The list is empty! |
 |
| Add |
 |
| Select the labels the group should have access to. |
 |
Review the settings.We review
our settings and select next:

 |
| Looks good? |
Now we
decide who will receive this policy and thereby see these labels:
 |
| Who should see the labels? |
On the Add
users and groups page, we select Add.
 |
| Add users or Groups page. |
Then we
find our group for this group (since we are still working on Andeby, we use that group)
 |
| Andeby will have their labels soon. |
We select
the checkbox for Andeby, and then Add and Done. As you can see below, we have added 1 user or
group.
 |
| As you can see: 1 user or group is specified. |
Next and then we have a couple of options. This is the place you can require users to apply a label on email and documents, and also we can require justification if users remove a label or lower classification label.
 |
| You can select that users must provide justification, but does it work? |
As we move on we are asked to provide a name and description for the policy:
 |
| Almost there. |
All that remains now is to publish:
 |
| You may edit here as well. |
When this is done, we repeat the process for the other groups, using the groups they belong to so that they can see their labels. We then have a list of labels that they will all see, but the label My will be a drop down menu, showing only the label they have access to.
Example. We here have a user that is an employee in the Smallville project group. Let's see how it looks for her:
 |
| Highly confidential is missing here. |
The observant ones of you may see that she is missing the highly confidential label, but this is just because I did not publish it to this group.
This became a pretty long post, but hopefully it was helpful. We created a top level label, and sublabels for the individual groups (in this case we made it into project groups). When this was done we published them to so that each group had their set of labels with one that protected info from all the other project groups in the same tenant. More than one organization in the same tenant is not as unusual anymore, and it is good to know that we do have some mechanisms to separate information as needed and this is one way to do it.


Comments
Post a Comment